

Android, the platform to develop mobile applications.
Is time to start to play with that.
It is assumed starting knowing nothing about Android.
It is assumed starting knowing nothing about Android.
The first thing is to have some documentation about Android in order to learn about it.
There are a lot of books and documentation out there, so I just started to grab something, possibly free (no resources to invest in that :) ).
There are a lot of books and documentation out there, so I just started to grab something, possibly free (no resources to invest in that :) ).
As introduction, also if is an old book, this PDF book can be useful, at least to have some basics idea about Android.
Of course there is the official updated Google documentation where to start, but I have to admit sometime a book is better as starting point.
Basically to start to develop for Android, at least three things are needed :
- The Android SDK
- Java SDK
- Eclipse plus Android plugins
Eclipse is actually suggested, is not mandatory, but since many examples and documentation assume Eclipse to be used, so it is :)
This article assumes the development host to be a Linux one (Ubuntu 10.04 and 12.04)
This article assumes the development host to be a Linux one (Ubuntu 10.04 and 12.04)
Installation
First of course download the latest versions of the software to be installed.
The system I used to install Android the first time, documented in this article, is a quad processor Dell computer, with Ubuntu 10.04 installed.
The system I used to install Android the first time, documented in this article, is a quad processor Dell computer, with Ubuntu 10.04 installed.
I was able to install the Android development software over a Kubuntu 12.04 following the procedure described on this article.
Java JDK
Java can be the critical part of the system and MUST BE present before to install the rest of the environment.
Probably Java already exists on the development machine, but it is possible is an old one or incompatible one with the Android SDK.
Probably Java already exists on the development machine, but it is possible is an old one or incompatible one with the Android SDK.
So the first thing to do is to verify if :
- Java already exists on the machine
- if the installed version is a JDK version (the JRE version is not enough)
- if the installed version is compatible with Android SDK
- eventually remove it and install the latest one
To verify what version of Java is installed on the machine (Linux only) ope a terminal and digit :
$ java -version
$ java -version
In my case I had :
steve@Oliver3:~$ java -version
java version "1.6.0_20"
OpenJDK Runtime Environment (IcedTea6 1.9.13) (6b20-1.9.13-0ubuntu1~10.04.1)
OpenJDK Server VM (build 19.0-b09, mixed mode)
steve@Oliver3:~$
The documentation about Android specify to have Java 1.5 or 1.6 and the JDK version, so I should be OK.
The latest JDK is available at this URL.
The first choice, the Java JDK, must be chosen.
In my case I selected this one :
In my case I selected this one :
http://www.oracle.com/technetwork/java/javase/downloads/jdk-7u3-download-1501626.html
After downloaded it I exctracted it in the /home/steve/Android directory but NOT installed for the moment since I assume the one already installed is OK.
CAUTION ! In some distributions Java JDK from Sun/Oracle is not available anymore !
In this case the OpenJDK is the "official" release to use with Android !
Android SDK
The Android SDK contains all the Java libraries to develop for Android plus tools to compile and debug the code, i.e. an Android simulator. So in theory there is no need to have a specific hardware (see note) in order to install and develop under Android.
The latest SDK can be download from the official Android website.
The latest SDK can be download from the official Android website.
Choose the SDK version for your system. In my case I choose the Linux one.
Create a directory somewhere on your disk where to exctract the tarball. I created :
/home/steve/Android and exctracted the tarball into android-sdk-linux.
Tip
Can be useful to have the SDK tools in the path. Many sources suggest to create a system variable called ANDROID_SDK and add it to the main path.
Edit the .profile file (in the main user home - for example in my case : /home/steve/.profile) and add : export ANDROID_SDK="/home/steve/Android/android-sdk-linux" export PATH="$PATH:$ANDROID_SDK/tools:$ANDROID_SDK/platform-tools"
Save the file. The next time the system starts the Android SDK path will be available, with also the system variable ANDROID_SDK.
|
Then, after reading the SDK Readme.txt file, I opened a terminal and run the android program under tool :
$ cd /home/steve/Android/android-sdk-linux/tools/./android (or if the path is set, ./android)
$ cd /home/steve/Android/android-sdk-linux/tools/./android (or if the path is set, ./android)
The program is needed in order to "populate" the SDK. The SDK exctracted is moslty empty.
By default is marked for installation the latest Andorid SDK, at the time of this article, the 4.0.3.
By default is marked for installation the latest Andorid SDK, at the time of this article, the 4.0.3.
Follow the instructions and install it (select Accept all)
I choose to install also the documentation. The installation tooks few minutes and of course is necessary to be online since everything needed is downloaded from Google.
Here a screenshot after the installation :

Note : at the installation time I didn't have ANY Android hardware. Having a specific hardware it means to select the version of Android capable to run on a specific one, not necessarily the latest one will work on a specific hardware !!
The project usually uses the correct version as defined in the project parameters.
To select the correct API to use for a project, go in the Project menu', select Properties and then choose Android.
The API in use for the project is stored in the file project.properties in the project root.
Eclipse
The last tool to have is Eclipse.
As said before is not mandatory, but since many examples and tools that simplify the life are based on Eclipse, I choose to install it and use it.
As said before is not mandatory, but since many examples and tools that simplify the life are based on Eclipse, I choose to install it and use it.
As suggested in the eBook, at the URL is possible to download Eclipse.
There are many different choices. I choose the "basic" Java version called Eclipse Classic.
There are many different choices. I choose the "basic" Java version called Eclipse Classic.
After downloading it, I exctracted in the /home/steve/Android/eclipse directory.
To start it, is enough to go in the eclipse directory and start ... eclipse :)
To start it, is enough to go in the eclipse directory and start ... eclipse :)
The first thing to do is to create a workplace for Eclipse. I created mine in the /home/steve/Android/Workplace directory.
Configuration
There are some plug-ins for Eclipse that integrate the Android SDK and facilitate to create Android applications.
The indications on the book are not exactly precise since the version of Eclipse is quite different.
So basically, from within Eclipse, go to the Help menu, select Install New Software.
A windows appears :

In the box Work with, digit the address of the repository for the Eclispe plug in for Android :
https://dl-ssl.google.com/android/eclipse/
https://dl-ssl.google.com/android/eclipse/
In the box below (Name) will appears the possible plug-ins. Mark them all then click on Next and follows the instructions.
After the installation Eclipse need to be restarted. After that it will asks for the Android SDK.
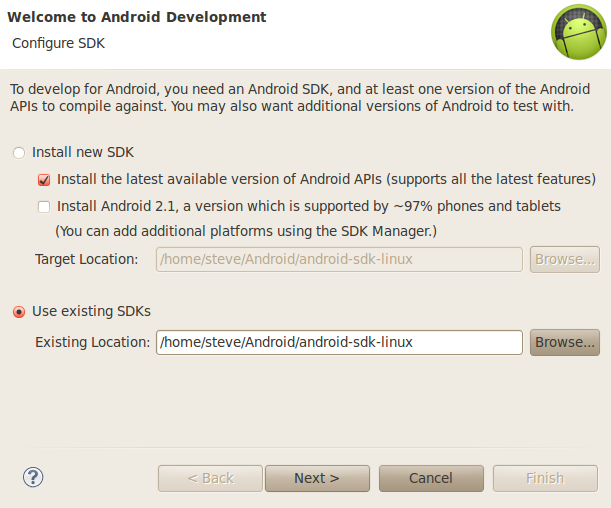
Since I already installed the SDK, I selected the Use existing SDKs and browse for the main directory of it.
Follows the instructions to complete the binding between Eclipse and Android SDK.
After this point, Eclipse is ready to be used to develop and debug Android applications.
No comments:
Post a Comment