I was asked if it was possible to print a replacement knob for a diagnostic machine.
This article describes what I did and the results.
The knob is for a laboratory machine, a thermal cycler S1000, from Bio-rad.
The knob is in plastic and is quite big.
Here some pictures of the knob to substitute.
Note that the knob I received was broken, so I had to guess the bottom shape since I did not have access to the machine.
 | |
 |
After few iterations and tests, with the remote help of a technician with access to the machine, doing also measurements for me, the final design did take shape.
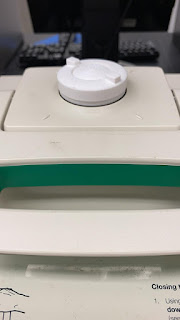
And here the replacement knob mounted in the machine
 |
The project is on Tinkercad :
- the Replacement knob
- the Knob cap
Note that both the projects are saved under the Common Creative NON commercial license, this work is not meant to be sold or to create profit.
G-code file preparation
Once downloaded the STL files I did open it with the slicer Cura Master version on LXDE Ubuntu 18.04.
The project is divided in two parts, so two different STL files are present.
Here the setting I used for the two STL files in the project:
- Material : Hatchbox white PLA
- Printer : Ender 3 Pro (stock but with yellow springs and glass bead)
- Layer Height : .12 mm
- Wall thickness : 1.2 mm
- Wall Line count : 3
- Top/Bottom thickness : 0.84 mm
- Top/Bottom layer : 7
- Shell :
- Wall thickness : 1 mm
- Wall Line count : 2
- Infill :
- 50
- Cubic
- Material :
- Printing temperature : 200 C
- Build plate temperature : 60 C
- Enable retraction
- Support
- Support placement : Touching Buildplate
- Support overhang angle : 59
- Speed :
- Initial print speed : 45 mm/s
- Print speed : 60 mm/s
- Build Plate adhesion :
- Raft
The file was then uploaded to OctoPrint for the print.
The knob takes about 5 hours to be printed, the cap about 50 minutes.
Note that the cap is upside down, so also the cap requires support but it was the best way in order to have detailed the rim.
The knob takes about 5 hours to be printed, the cap about 50 minutes.
Note that the cap is upside down, so also the cap requires support but it was the best way in order to have detailed the rim.


No comments:
Post a Comment