
In order to diagnose/repair a Roomba, it is necessary to do some test and measurements.
Even if each Roomba has a diagnostic program on-board, often is necessary to have more control and a better feedback, with also some measurements.
To do so the basic tool every Roomba-hacker needs to have is a cable to connect the Roomba with a PC.
To do so the basic tool every Roomba-hacker needs to have is a cable to connect the Roomba with a PC.
There are many ways to buy/build such cable.
This article describe how I did it, just to give ideas. Is not necessarily the best way but it worked for me.
Material
We started from a consumer SIM USB card reader. These readers are available on ebay and similar places for few dollars.
Here a picture of the electronic board (they usually come in some kind of plastic box).
This article describe how I did it, just to give ideas. Is not necessarily the best way but it worked for me.
Material
We started from a consumer SIM USB card reader. These readers are available on ebay and similar places for few dollars.
Here a picture of the electronic board (they usually come in some kind of plastic box).

These USB SIM card readers usually are based on a chip capable to convert the USB port into a serial one, the Prolific PL-2303.
Then a cable with a minidin connector is needed and eventually a PCB minidin.
In my specific case I used :
Then a cable with a minidin connector is needed and eventually a PCB minidin.
In my specific case I used :
- USB SIM card reader
- 8 pin minidin PCB outlet
- 8 pin minidin cable (at both ends)
Preparation
The first thing to do is to remove from the USB SIM card some useless components, like the SIM card connector, a 74HC04 and a Crystal (3.5 Mhz).

At this point is necessary to identify on the PL-2303 the pins we need to connect.
- Pin 1 PL-2303
TXD -> connected to the Roomba RXD (pin 3 minidin) - Pin 3 PL-2303
RTS -> connected via a transistor to the Roomba Power pin (pin 6 minidin 7 - pin 5 minidin 8) - Pin 5 PL-2303
RXD -> connected to the Roomba TXD (pin 5 minidin 8 - pin 4 minidin 8) - Pin 7 PL-2303
GND - pin 6/7 minidin 7 - pin 7/8 minidin 8)
Here the schematic of what we want to do :
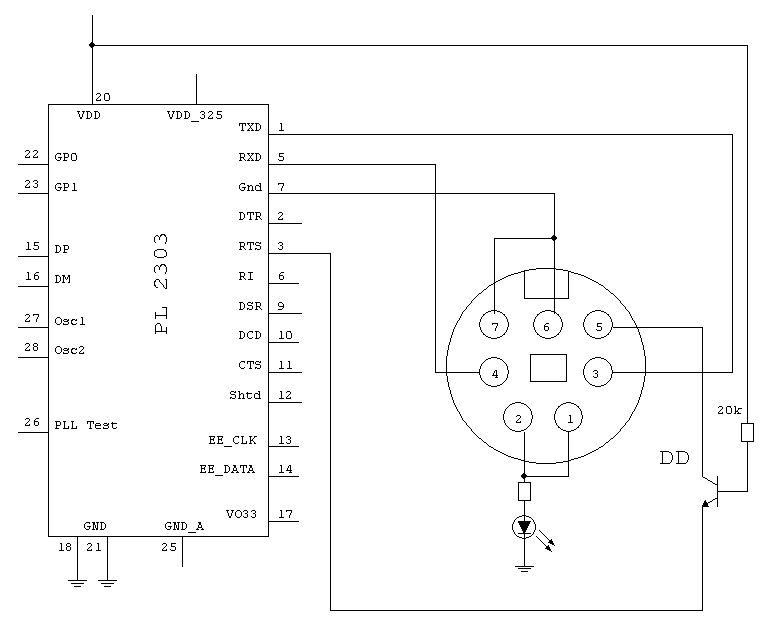
It is very important to pay attention of the type of minidin used.In the schematic I used the original Roomba minidin 7, so the pinout is DIFFERENT from the minidin 8 !
On the net is possible to find information about the pinout and specifications, like here.
Here some pictures of cable preparation.


