Translate

Tuesday, November 6, 2012

Wordhunt


This is a silly subject but maybe it can be useful to someone.
I was tired to spend hours to check the wordhunt homework of my daughter, so  I developed a simple program capable to scan the puzzle and find a specific word.

In this way it is quick and easier to see if a word really exist in the puzzle.


The WordHunt

The WordHunt is basically a matrix containing letters.
The purpose of the "game" is to find words embedded in the puzzle.
The words can be read in any direction, i.e. starting from left to right, or right to left, or up to down, down to up or diagonally in any direction.
Words can be find using letters used for other words,in other words, a letter in the matrix can belong to more than a single searched word.

Usually the wordhunt puzzle consist in the matrix and in a series of word to "hunt".
The purpose is to mark the found words in the matrix.

The program 

The program is quite simple and straightforward.
First you have to load the matrix.
To do so you can do manually or create an ASCII  file containing it.

Then the program (only text mode) will display the puzzle and it will wait for a word to search.


The search for the word will include all the directions, letter by letter.

When the first letter is found, the program explore all the adjacent letters, in all directions (up, down, left, right, diagonal left  up and down, diagonal right up and down).
If the second letter is found, the program store the direction found and continue on that direction to compare the searching word.

If the word is found the matrix is printed with the found letters among brackets.
In the example below, the word "gusto" found in the puzzle, from right to left.

The xword.txt file

To simplify the introduction of the puzzle, the program is looking for an ASCII file  called xword.txt containing the puzzle.
Any line starting with the character # is a comment and thus ignored by the program.

Here an example :

# Crossword Word hunt - Science Sept 20 homework
# Sept 2008

# The first valid line indicate the number of rows
# The second valid line indicate the number of columns
# An empty line must be present after the number of columns
# After that, each line contains a valid crossword row - no spaces allowed
#
# Renomine or copy this file as xword.txt to use it
#
11
14

LGEPOREXMQPCMA
CBASEXUALAMINO
YXCCVTKMEIOSIS
TMISUGARZMLLUO
OQDDAERYMGENES
PROKARYOTICYNO
LYXEIQOTTUUCZM
ABYPROTEINLMYT
SWGWREIEBEEGMT
MTEYWJCELLSEES
HJNUCLEUSETBSR

The first valid line (i.e. not a comment or empty) contains the number of rows, the second valid line the number of columns.

Then an empty line must be present and then the puzzle itself must be loaded.

Notes

The programs accepts some commands.


  • h
    Help
  • f
    force the program to load the xword.txt file

To finish the program, just press Enter instead a searching word.

The code


/*
 *  Word Hunter
 *  This program is looking in a word hunter crossword for some words.
 *  Programmer : SB - Sept 2008
 */

#include <stdio.h>
#include <stdlib.h>
#include <string.h>

#define MAXLENWORD  100
#define NOCHARMASK  0xFFFF

#define RF_READROW 0 /* Read file status - Acquire number of rows */
#define RF_READCOL 1 /* Read file status - Acquire number of columns */
#define RF_READCRW 2 /* Read file status - Read crossword */
#define RF_FINISH 3 /* Read file status - Finish */

/*
 *  Global variables
 */
unsigned char *xword_matrix; /* Pointer for the cross word matrix */
int Limit_X = 10; /* Limit for the X position of the Matrix */
int Limit_Y = 10; /* Limit for the Y position of the Matrix */
int Foundword[MAXLENWORD]; /* Array to store the sequence of address for the found word */
int Direction; /* The variable contains the direction of the word found 
                                         *
                                         *    1 -> letter found - direction left diagonal up    (X-1 / Y-1)
                                         *    2 -> letter found - direction up                  (X-1 / Y  )
                                         *    3 -> letter found - direction right diagonal up   (X-1 / Y+1)
                                         *    4 -> letter found - direction left                (X   / Y-1)
                                         *    5 -> letter found - direction right               (X   / Y+1)
                                         *    6 -> letter found - direction left diagonal down  (X+1 / Y-1) 
                                         *    7 -> letter found - direction down                (X+1 / Y  )
                                         *    8 -> letter found - direction right diagonal down (X+1 / y+1)
                                         */
/*
 *  Function prototypes 
 */

void init_matrix();
void load_matrix();
void display_matrix(char *);
int search_matrix(char *);
char search_letter(char, int *, int *);
char search_direction(char *, char, int, int);
char check_coordinates(char, int, int);
char set_coordinates(char, int *, int *);
int prepare_address(int, int);
void initFoundword();
void reorderFoundword();

/*
 *  The program has some line input.
 *  ./wh f
 *
 *  If the 'f' parameter exists, then a file named xword.txt is searched and if found read it.
 *  The file is structured in this way :
 *  - # in the first column indicate a comment
 *  - The first valid row contains the number of rows
 *  - The second valid row contains the number of columns
 *  - the rest of the file will contains the crossword, each line is a row
 *
 */
int main(int argc, char * *argv)
{
   int i;
   int sx, sy = 0;
   char buffer[80];
   char ch, isSearch;
   FILE *xword_fp;
   char buf81[81];
   char stateReadFile = RF_READROW;

   /*
    *  Inputselection is a flag that indicate where the crossword is coming :
    *   0 = local input
    *   1 = file
    *   2 = leave init crossword
    */
   char inputSelection = 0;

   if(argc > 1)
   {
      if((*argv[1] == 'f') || (*argv[1] == 'F'))
         inputSelection = 1;

      if((*argv[1] == 'h') || (*argv[1] == 'H'))
      {
         printf("\n\nCWHS - Crossword Word Hunting Solver\n");
         printf("------------------------------------\n\n");
         printf("This program allow to search in a crossword, if a word exist. \n");
         printf("The crossword can be loaded manually or using a file named xword.txt in  \n");
         printf("the same directory of this program. \n");
         printf("To load the file, digit ./cwhs f    \n");
         printf("To exit from the program, just press Enter at the search word request.\n");
         printf("Pay attention to use for the search the same letter case present in the crossword. \n\n");

         exit(0);
      }
   }

   printf("\n\nCWHS - Crossword Word Hunting Solver\n");
   printf("------------------------------------\n");
   printf("(digit ./cwhs h  for help)\n\n");

   initFoundword();         /* Initialize found word array */

   if(inputSelection == 0)
   {
      printf("Input how many rows : ");
      scanf("%d", &Limit_X);
      printf("Set %d num rows\n", Limit_X);

      printf("Input how many columns : ");
      scanf("%d", &Limit_Y);
      printf("Set %d num columns\n", Limit_Y);

      xword_matrix = malloc(Limit_X * Limit_Y * sizeof(char *));

      init_matrix();   
      display_matrix("->manual<-");
      load_matrix();
   } 
   else if(inputSelection == 1)
   {
      /* Read file "xword.txt" */
      printf("Reading file xword.txt in order to load the crossword\n");
      if((xword_fp = (fopen("xword.txt", "r"))) == (FILE *) NULL)
      {
         printf("Could not open xword.txt\n");
         exit(0);
      }

      while(fgets(buf81, 80, xword_fp))              /* Read chars from file    */
      {
         if(buf81[0] == '#')
            continue;

         switch(stateReadFile)
         {
            case RF_READROW: /* Acquire number of rows */
               sscanf(buf81, "%d", &Limit_X);
               printf("Set %d num rows\n", Limit_X);
               stateReadFile++;
               break;

            case RF_READCOL: /* Acquire number of columns */
               sscanf(buf81, "%d", &Limit_Y);
               printf("Set %d num columns\n", Limit_Y);
               stateReadFile++;
               break;
        
            case RF_READCRW: /* Allocate crossword */
               xword_matrix = malloc(Limit_X * Limit_Y * sizeof(char *));

               init_matrix();   
/*             display_matrix();  */
               stateReadFile++;
               sx = 0;
               sy = 0;
               break;
        
            case RF_FINISH: /* Load crossword, a row at a time */
               for(sy=0; sy< Limit_Y; sy++)
               {
                  xword_matrix[sx * Limit_Y + sy] = buf81[sy];
               }
               sx++;
               break;

            default:
               printf("ERROR reading file !!");
               exit();
               break;
         }
      }

      fclose(xword_fp);
      printf("Downloading Completed!\n");
      printf("Here the matrix loaded\n");
      display_matrix("-");
   }

   isSearch = 1;
   while(isSearch)
   {
      printf("\nStart search ! Input the word to find : ");
      /* Read in single line from "stdin": */
      for( i = 0; (i < 80) &&  ((ch = getchar()) != EOF) 
                           && (ch != '\n'); i++ )
         buffer[i] = (char)ch;
      buffer[i]=0;

      if(i==0 && ch=='\n')
         isSearch = 0;
      else
         if(search_matrix(buffer))
            display_matrix(buffer);
   }

   free(xword_matrix);
   printf("\nBye\n\n");
}

/*
 *  init_matrix
 *  This function create and initialize a matrix for the crossword letters
 *  The limits are loaded before
 */
void init_matrix()
{
   int x,y;
   char letter = 'A';

   for(x=0; x< Limit_X; x++)
   {
      for(y=0; y< Limit_Y; y++)
      {
         xword_matrix[x * Limit_Y + y] = letter;
      }

      letter++;
   }
}

/*
 *  load_matrix
 *  This function create and load a matrix with the crossword letters
 *  The limits are loaded before
 */
void load_matrix()
{
   int i,x,y,ch;
   unsigned char valid_input = 0;
   char buffer[81];

   printf("\n Input the word hunt crossword, one row at time\n");

   /*
    *  Flush STDIN
    */

   while((ch = getchar()) != EOF && ch != '\n')
      continue;

   for(x=0; x< Limit_X; x++)
   {
      valid_input = 0;

      do
      {
         printf("Input row n. %d : ", x);
         /* Read in single line from "stdin": */
         for( i = 0; (i < 80) &&  ((ch = getchar()) != EOF) 
                              && (ch != '\n'); i++ )
            buffer[i] = (char)ch;

         if(i == 0 && ch == '\n') /* If no input, keep the matrix row */
         {
            for(y=0; y< Limit_Y; y++)
            {
               buffer[y] = xword_matrix[x * Limit_Y + y];
            }
            valid_input = 1;
            break;
         }

         if(i != Limit_Y)
            printf("\n\nATTENTION ! The number of characters introduced are different than %d !\n", Limit_Y);
         else
            valid_input = 1;

         if(i > Limit_Y)
         {
            printf("The extra character will be ignored !\n");
            valid_input = 1;
         }
         if(i < Limit_Y)
            printf("Not enough characters ! Do it again !\n");
      } while(!valid_input);

      for(y=0; y< Limit_Y; y++)
      {
         xword_matrix[x * Limit_Y + y] = buffer[y];
      }
      printf("\n");
   }      
}

/*
 *  display_matrix
 *  This function print out the matrix with the crossword letters
 *  The limits are loaded before
 */
void display_matrix(char *searchname)
{
   int x,y;
   int address;
   int found_index = 0;
   int display_found = 0;

   printf("\n\n------Display Matrix [%s]------\n\n", searchname);

   reorderFoundword();

   /*
    *  Print the Colum title
    */
   printf("Column  ");
   for(y=0; y< Limit_Y; y++)
      printf("%02d ", y);
   printf("\n");

   printf("----------");
   for(y=0; y< Limit_Y; y++)
      printf("---", y);
   printf("\n");

   /*
    *  Print the matrix and the row title
    */

   for(x=0; x< Limit_X; x++)
   {
      printf("Row %02d -", x);

      for(y=0; y< Limit_Y; y++)
      {
         address = prepare_address(x,y);  /* Calculate the address of the letter to display */

         if(Foundword[found_index] != NOCHARMASK &&
            address == Foundword[found_index])
         {
            printf("[%c]", xword_matrix[address]);
            if(found_index < MAXLENWORD)
               found_index++;
         }
         else
            printf(" %c ", xword_matrix[address]);

      }
      printf(" \n");
   }
}

/*
 *  The function search if the input word is present in the matrix
 *  Return 0 if the word is not found, 1 if the word is found
 */
int search_matrix(char *word)
{
   int retfunz = 0;
   int mtx_x, mtx_y;
   int fnd_x, fnd_y;
   int fnd_index = 0;
   int statesearch = 0;
   char ch;
   char dirflag = 0xff;

   /*
    *  Search the first letter of the word in the matrix
    *  Initialize the coordinates
    */
   mtx_x = 0; /* Coordinates for the matrix search */
   mtx_y = 0;
   fnd_x = 0; /* Coordinates for the word search */
   fnd_y = 0;

   initFoundword(); /* Initialize found word array */
   
   do
   {
      switch(statesearch)
      {
         case 0:  /* Search the first letter */
            ch = word[0];
/*          printf("Looking for first letter of [%s] [%c] starting from %d,%d\n", word, ch, mtx_x, mtx_y); */
            if(search_letter(ch, &mtx_x, &mtx_y))
            {
/*             printf("Found first letter of [%s] at %d,%d\n", word, mtx_x, mtx_y); */
               dirflag = 0xFF; /* Enable all the possible direction */
               Foundword[0] = prepare_address(mtx_x, mtx_y);
               statesearch = 1;
            }
            else
            {
               statesearch = 99; /* Force endsearch ! */
               initFoundword();         /* Erase found word array */
               printf("The word [%s] is not in the crossword\n", word);
            }
            break;

         case 1:  /* Search the second letter and direction */
            ch = word[1];
/*          printf("Looking for second letter of [%s][%c] around %d,%d\n", word, ch, mtx_x, mtx_y); */

            fnd_x = mtx_x;
            fnd_y = mtx_y;

            Direction =  search_direction(&dirflag, ch, fnd_x, fnd_y);
            fnd_index = 1; /* Start from the second letter for the search if the test is successful */
            statesearch = 2; /* Assume second letter is found. If not, default force back */

            switch(Direction)
            {
                case 1: /* left diag up */
/*                 printf("Letter %c found at left diag up\n", ch); */  /* Diagnostic print */
                   dirflag &= ~0x01;
                   break;
                case 2: /* up  */
/*                 printf("Letter %c found at up\n", ch); */  /* Diagnostic print */
                   dirflag &= ~0x02;
                   break;
                case 3: /* right diag up */
/*                 printf("Letter %c found at right diag up\n", ch);  */  /* Diagnostic print */
                   dirflag &= ~0x04;
                   break;
                case 4: /* left */
/*                 printf("Letter %c found at left\n", ch); */  /* Diagnostic print */
                   dirflag &= ~0x08;
                   break;
                case 5: /* right */
/*                 printf("Letter %c found at right\n", ch); */  /* Diagnostic print */
                   dirflag &= ~0x10;
                   break;
                case 6: /* left diag down */
/*                 printf("Letter %c found at left diag down\n", ch); */  /* Diagnostic print */
                   dirflag &= ~0x20;
                   break;
                case 7: /* down */
/*                 printf("Letter %c found at down\n", ch); */  /* Diagnostic print */
                   dirflag &= ~0x40;
                   break;
               case 8: /* right diag down */
/*                 printf("Letter %c found at right diag down\n", ch); */  /* Diagnostic print */
                   dirflag &= ~0x80;
                   break;
               default:
/*                 printf("Letter %c not found around %d, %d\n", ch, fnd_x, fnd_y); */  /* Diagnostic print */
                   /*
                    *  Second letter not found !
                    *  Return to the state 0 and continue to search for the first letter starting
                    *  from the last coordinates
                    */
                   statesearch = 0;

                   mtx_y++; /* Update to the next character */
                   if(mtx_y > Limit_Y-1)
                   {
                      mtx_x++;
                      mtx_y = 0;
                      if(mtx_x > Limit_X-1)
                         statesearch = 99;
                   } 
                   break;
            }
            break;

         case 2: /* Check for other letters following the direction */
            /*
             *  Update the found coordinates to the second letter using the found direction
             *  and re-check
             */
            if(set_coordinates(Direction, &fnd_x, &fnd_y))
            {
               if(check_coordinates(word[fnd_index], fnd_x, fnd_y))
               {
                  /*
                   *  Letter found - pass to the next following the same direction
                   */
                  Foundword[fnd_index] = prepare_address(fnd_x, fnd_y);
                  fnd_index++;
                  if(fnd_index == strlen(word))
                  {
                     printf("Word [%s] found in the crossword ! \n", word);
                     retfunz=1;
                     statesearch = 99;
                  }
               }
               else
               {
                  /*
                   *  Letter not found ! Abort the word search and go back to direction search
                   *  Return to the state 1 and continue to search for the second letter starting
                   *  from the last coordinates
                   */
                  statesearch = 1;
               }
            }
            else
            {
               /*
                *  Coordinates over the limits ! Abort the word search and go back to matrix search
                *  Return to the state 0 and continue to search for the first letter starting
                *  from the last coordinates
                */
               statesearch = 1;
            }
            break;
      }
   } while(statesearch != 99);
   return(retfunz);
}

/*
 *  Search letter
 *  Starting from a specific coordinates (X and Y) the function is looking for
 *  the input letter in the matrix
 *  The function return the found letter or 0 if the letter is not present
 *  The coordinates are updated as weel to the found letter
 */
char search_letter(char letter, int *inp_x, int *inp_y)
{
   int x,y;

   y=*(inp_y);

   for(x=*(inp_x); x< Limit_X; x++)
   {
      for(;y< Limit_Y; y++)
      {
         if(xword_matrix[x * Limit_Y + y] == letter)
         {
            *(inp_x) = x;
            *(inp_y) = y;
            return(letter);
         }
      }
      y=0;
   }
   return(0);
}

/*
 *  Search direction
 *  Starting from a specific coordinates (X and Y) the function is looking for
 *  the input letter in the box around the coordinates.
 *  The function return :
 *    0 -> no letter found around the coordinates
 *    1 -> letter found - direction left diagonal up    (X-1 / Y-1)
 *    2 -> letter found - direction up                  (X-1 / Y  )
 *    3 -> letter found - direction right diagonal up   (X-1 / Y+1)
 *    4 -> letter found - direction left                (X   / Y-1)
 *    5 -> letter found - direction right               (X   / Y+1)
 *    6 -> letter found - direction left diagonal down  (X+1 / Y-1) 
 *    7 -> letter found - direction down                (X+1 / Y  )
 *    8 -> letter found - direction right diagonal down (X+1 / y+1)
 *
 *  The function uses a byte (bit setting) to allow a direction.
 *  This is needed for multiple research
 *  The flagdir has this format :
 *    xxxxxxxx
 *    ||||||||__ direction 1  (0 ignore - 1 allow)
 *    |||||||__ direction 2  (0 ignore - 1 allow)
 *    ||||||__ direction 3  (0 ignore - 1 allow)
 *    |||||__ direction 4  (0 ignore - 1 allow)
 *    ||||__ direction 5  (0 ignore - 1 allow)
 *    |||__ direction 6  (0 ignore - 1 allow)
 *    ||__ direction 7  (0 ignore - 1 allow)
 *    |__ direction 8  (0 ignore - 1 allow)
 */
char search_direction(char *dirflag, char letter, int x, int y)
{
   int address;
   char flagdir = *(dirflag);

   /* Check for left diagonal up */
   if((flagdir & 0x01) && (x > 0 && y > 0))
   {
      address = (x-1) * Limit_Y + (y-1);
      if(xword_matrix[address] == letter)
         return(1); /* Found left diagonal up ! */
   }      

   /* Check for up */
   if((flagdir & 0x02) && (x > 0))
   {
      address = (x-1) * Limit_Y + y;
      if(xword_matrix[address] == letter)
         return(2); /* Found up ! */
   }      

   /* Check for right diagonal up */
   if((flagdir & 0x04) && (x > 0 && y < Limit_Y))
   {
      address = (x-1) * Limit_Y + (y+1);
      if(xword_matrix[address] == letter)
         return(3); /* Found right diagonal up ! */
   }      

   /* Check for left */
   if((flagdir & 0x08) && (y > 0))
   {
      address = x * Limit_Y + (y-1);
      if(xword_matrix[address] == letter)
         return(4); /* Found left ! */
   }      

   /* Check for right */
   if((flagdir & 0x10) && (y < Limit_Y))
   {
      address = x * Limit_Y + (y+1);
      if(xword_matrix[address] == letter)
         return(5); /* Found right ! */
   }      

   /* Check for left diagonal down */
   if((flagdir & 0x20) && (x < Limit_X && y > 0))
   {
      address = (x+1) * Limit_Y + (y-1);
      if(xword_matrix[address] == letter)
         return(6); /* Found left diagonal down ! */
   }      

   /* Check for down */
   if((flagdir & 0x40) && (x < Limit_X))
   {
      address = (x+1) * Limit_Y + y;
      if(xword_matrix[address] == letter)
         return(7); /* Found down ! */
   }      

   /* Check for right diagonal down */
   if((flagdir & 0x80) && (x < Limit_X && y < Limit_Y))
   {
      address = (x+1) * Limit_Y + (y+1);
      if(xword_matrix[address] == letter)
         return(8); /* Found right diagonal down ! */
   }      

   return(0);
}

/*
 *  check_coordinates
 *  The function check if a letter exist at specific coordinates
 *  The function return :
 *    0 -> no letter founda at the coordinates
 *    1 -> letter found
 */
char check_coordinates(char letter, int x, int y)
{
   int address;

   address = prepare_address(x,y);

/*   printf("Check_coordinates [%d,%d] - input letter : [%c] - found letter : [%c]\n",
           x,y, letter, xword_matrix[address]);  */  /* Diagnostic print */

   if(xword_matrix[address] == letter)
      return(1); /* Found letter */
   else
      return(0);
}

/*
 *  set_coordinates
 *  The function calculate a new set of coordinates giving a starting X,Y and a direction.
 *  The function return :
 *    0 -> impossible to calculate coordinates (es. reach limits)
 *    1 -> coordinates calculated
 */
char set_coordinates(char direction, int *inp_x, int *inp_y)
{
   int x,y;

   x=*(inp_x);
   y=*(inp_y);

/* printf("set_coordinates - Input [%d:%d] ", x,y); */  /* Diagnostic print */

   switch(direction)
   {
      case 1: /* left diag up - X-1 / Y-1 */
         x--;
         y--;
         break;
      case 2: /* up - X-1 / Y  */
         x--;
         break;
      case 3: /* right diag up - X-1 / Y+1 */
         x--;
         y++;
         break;
      case 4: /* left  - X / Y-1 */
         y--;
         break;
      case 5: /* right - X / Y+1 */
         y++;
         break;
      case 6: /* left diag down - X+1 / Y-1 */
         x++;
         y--;
         break;
      case 7: /* down - X+1 / Y */
         x++;
         break;
      case 8: /* right diag down - X+1 / Y+1 */
         x++;
         y++;
         break;
      default:
/*       printf("Direction not allowed !\n");  */  /* Diagnostic print */
         return(0);
         break;
   }

   /*
    *  Check for Limits !
    */
   if((x >=0 && x< Limit_X) && (y >=0 && y< Limit_Y))
   {
/*    printf(" Output [%d:%d]\n", x,y); */  /* Diagnostic print */

      *(inp_x) = x;
      *(inp_y) = y;
      return(1);
   }
   else
   {
      printf("Output out of limits\n");
      return(0); /* Out of limits ! */
   }
}    

/*
 *  prepare_address
 *  The function return the address of a letter giving the X and Y
 */
int prepare_address(int x, int y)
{
   return(x * Limit_Y + y);
}

/*
 *  Initialize Foundword array
 */
void initFoundword()
{
   int i;
   for(i=0; i<MAXLENWORD; i++)        /* Erase found word array */
      Foundword[i]=NOCHARMASK;
   Direction = 0;
}

/*
 *  reorder_foundword
 *  The function reorder the foundword array considering the direction
 *  The Funword array always contains the found wourd sequence in the alphabetical order.
 *  The display_matrix function, prints out the matrix starting from the top left corner
 *  to the lower right corner, row by row.
 *  So to correctly display the found word, the Foundword array needs to contain the 
 *  found word in the display order and not alphabetical order.
 */
void reorderFoundword()
{
   int temparray[MAXLENWORD];
   int foundword_len = 0;
   int i;

   for(i=0; i<MAXLENWORD; i++)        /* Erase temp array and count length found word*/
   {
      temparray[i]=NOCHARMASK;
      if(Foundword[i] != NOCHARMASK)
         foundword_len++;
   }

   printf("Word %d character length\n", foundword_len);

/* printf("Show Foundword before reorder \n");
   for(i=0; i<MAXLENWORD; i++)
      if(Foundword[i] != NOCHARMASK)
         printf("%d ",Foundword[i]);
   printf("\n"); */  /* Diagnostic print */

   switch(Direction)
   {
      case 1: /* left diag up - X-1 / Y-1 */
         printf("Word in diagonal from right to left - up\n");
         break;
      case 2: /* up - X-1 / Y  */
         printf("Word in vertical, first letter down \n");
         break;
      case 3: /* right diag up - X-1 / Y+1 */
         printf("Word in diagonal from left to right - up\n");
         break;
      case 4: /* left  - X / Y-1 */
         printf("Word in horizontal from right to left\n");
         break;
      case 5: /* right - X / Y+1 */
         printf("Word in horizontal from left to right\n");
         break;
      case 6: /* left diag down - X+1 / Y-1 */
         printf("Word in diagonal from right to left - down \n");
         break;
      case 7: /* down - X+1 / Y */
         printf("Word in vertical - first letter up \n");
         break;
      case 8: /* right diag down - X+1 / Y+1 */
         printf("Word in diagonal from left to right - down \n");
         break;
   }

   printf("\n");

   /*
    *  If the direction is compatible with the display, get out
    */
   if(Direction == 5 || Direction == 6 || Direction == 7 || Direction == 8)
      return;

   foundword_len--;

   switch(Direction)
   {
      case 1: /* left diag up - X-1 / Y-1 */
      case 2: /* up - X-1 / Y  */
      case 3: /* right diag up - X-1 / Y+1 */
      case 4: /* left  - X / Y-1 */
         for(i=0; i<MAXLENWORD; i++)
         {
            temparray[i]=Foundword[foundword_len];
            foundword_len--;
            if(foundword_len < 0)
               break;
         }
         break;
   }

   for(i=0; i<100; i++)        /* Restore reordered array */
   {
      Foundword[i] = temparray[i];
   }

/* printf("Show Found word after  reorder \n");
   for(i=0; i<MAXLENWORD; i++)
      if(Foundword[i] != NOCHARMASK)
         printf("%d ",Foundword[i]);
   printf("\n"); */  /* Diagnostic print */

   return;
}


The program was tested and used in a Linux machine (Ubuntu 8.04).
Save it in a file (like wh.c) and compile it with gcc (gcc wh.c).
If somebody will expand it/improve it I would like to have a copy :)

Problems/Improvements


The program is only in text, not in graphic mode.
No spaces are allowed in the searching word.
No upper/case conversion is provided. The searched word MUST be based on the letters present in the puzzle.
So if the puzzle contains lower case letters, all the possible searched words must be in lower case.
The maximum length of a searched word is 100.


Tuesday, October 30, 2012

Ryobi wired


Time ago I bought some wireless tools from Ryobi .
Nice tools. The "kit" included a drill and and a hand-circular saw.
For a while they worked just fine, then as expected, the batteries died.
In order to use them I have to buy new battery.

The original ones were NiCd 18V, but now there are available also Lithium ones.


The problem of course is the cost !
The NiCd new are around 30/35$ each, the Lithium are around 50$ each.
In the case of the Lithium I have also to buy a new charger. So basically an investment of ~120$.

Since I'm not using often the tools, and when it happens usually I'm at home, I looked for  a different solution.

The first idea was to change the internal batteries with a new series.
However there are two problems to follow this idea :

  • the cost of the "raw" batteries is not so distant from the original or refurbished one
  • it's a quite mechanically challenge because the way the batteries are connected
So I decided to follow another way.
Simply to create a "wired" battery ! 
In other words, the idea is to use the battery holder emptied by the batteries and connect it to  a power supply capable to drive the tools.

CAUTION !
This modification will avoid any kind of warranty and can be potentially lethal if you DON'T KNOW what you are doing !
If you decide to do this modification the responsibility is only YOURS !

Battery holder preparation

The first step is to prepare the battery holder.
To open it, there are 6 Philips screws to remove.
The yellow cap will simply come out, exposing the batteries.
Once opened, remove all the batteries, leaving the only one  attached  to the contacts, cutting out the piece of metal soldered to the batteries.
Don't throw in the landfill the batteries ! Recycle them !
I use the Battery Solutions services for that.
The battery left attached to the contacts it is needed for the mechanical support of the contacts, don't remove it.


Simply connect a wire for the positive (originally it is  the battery itself to be connected to the contact) and put back the contacts in it's place with some glue (I used hot glue).
Then do a hole in the battery holder and connected a power outlet.
I choose one  compatible with the first power supply attempt (see below).


Of course this modification is related only to the battery holder. It is still possible to use the tool with new batteries.

Power supply  - first attempt

The first attempt is based on some articles I found on internet.
Somebody claimed to use a 18V 2A power supply from an old printer, like this one :


On eBay I did find a similar power supply, a 18V, 3.5 A switching power supply.
It didn't work as expected though.
It can drive the drill but not at the maximum speed and as soon the drill starts to really work, the power is not enough.
This brought me to the ...

Power supply - second attempt 

The second attempt is to actually build a suitable power supply.
The word to use here is "electric current", so we need a good old simple linear power supply.
In the end we need to power motors, so I started to look around and I found an old battery broken UPS from APC, the APC 500.
AGAIN CAUTION !  

A UPS can be very dangerous even if disconnected from the grid !!
If you don't know what to expect and how to operate safely, DON'T EVEN OPEN IT !!!

Strip out everything and leave only the main transformer in the unit.
I put it down a classic simple power supply schematic :

The first attempt is just to obtain a decent DC voltage, no regulators or fancy stuff, just a very brute force power supply.
I was unable to find the specifications for the APC transformer, so I don't know how much current is capable to give, but at least I was able to measure the voltage, around 16 V between the yellow and white wires.
After the rectification we should have around 22V (Vpk/1.4142 - 6/1.4142 = ~22V) without any load.
Applying a load the voltage should drop a little bit, going around 18-19V, i.e. what we actually need to drive the tools motor.
Also I decided to reuse the UPC box and accessories  to contains the power supply.
I just bought two fuse holder, the capacitors (actually they are 50V, not 35V but is OK) and the 35A bridge.
Here some pictures of the UPS unit .. refurbished :)


The power supply is just perfect and is working just fine.
With no load I have a 22 Volt as predicted, value that drops around 18-19 Volt when a tool is in use.
For a normal use I don't expect to have heat problems.

I can operate now my Ryobi tools with the same battery performance.
Eventually I'll remove from the battery holder the outlet and instead I'll wire it directly for a better mechanical coupling.

Sunday, August 12, 2012

Set up WiFi monitor with Wireshark

Sometimes is necessary to be able to see the traffic generated, or directed to, a WiFi appliance.
There are many possible ways to capture packets from a WiFi appliance, especially if the appliance allows to install packet capture applications.
However not always such thing is possible and considered the nature of the WiFI appliance, it can change the performances.
This article describes how I did set up an external monitor for the traffic to and from a WiFi appliance.

Basics


The idea is to put a computer running wireshark between the router WiFi and the rest of the network.
The main constraint is to have a WiFi router SEPARATED by the rest of the network.
This a graphic representing the  setting :


The key part is a laptop with two NIC cards. In my case the laptop is running Kubuntu 12.04

Shopping list

It is needed :
 
  • 1 laptop with Linux installed, with two ethernet ports
  • 1 PCMCA NIC if the laptop has already an embedded NIC
  • bridge utilities
  • Wireshark 

The environment 

The machine used to build the monitor is a Gateway Tablet running Kubuntu 12.04, plus a LinkSys PCMCA NIC card.
The first step, recognizing the extra NIC card, should not pose any problem.
In my case the LinkSys NIC was recognized and configured automatically by the OS as eth1.
The next step is to install Wireshark from the Kubuntu repository, and enabled it to capture packets from eth0 or eth1.


Bridge setting

After preparing the hardware and tested both the ethx ports, it is necessary to set up the machine to act as a bridge, in order to have packets received from the eth0 port sent to the eth1 port, and viceversa.
Without such functionality, the two networks are isolated, i.e. the phone can not receive anything from the network.

In order to simplify the configuration, I forced on both the NIC a manual address.


  • 192.168.2.71
    for the eth0 
  • 192.168.2.72
    for the eth1. 

After opening a terminal, I installed the brctl program (sudo apt-get install bridge-utils).
The bridge-utils are not installed by default in the Kubuntu 12.04 but are available in the repository.
At this point I created, configured and activated a bridge between the two NICs.


  • sudo brctl addbr wshark
    Creates a new bridge called wshark 
  • sudo brctl addif wshark eth0
    Adds the eth0 to the wshark bridge 
  • sudo brctl addif wshark eth1
    Adds the eth1 to the wshark bridge 
  • sudo brctl stp wshark on
    Enables the STP 


After creating the bridge, it has to be activated.
To do so, simply use the ifconfig command :

sudo ifconfig wshark up

At this point the bridge should be working.
Note that after issuing these commands the eth0 and eth1 are not accessible anymore.
It is convenient to create a script with all the above commands to simplify the setting of the system.


Running Wireshark


After the bridge is activated is possible to run Wireshark.

Among the available interfaces to use to capture traffic, it will be present a wshark interface that is the bridge.

To capture data transiting the two inetrfaces, just choose that one.


Thursday, June 21, 2012

The Logitech saga ...

OK. Let me state as first thing, that Logitech is NOT paying me for this   :)
I love this company ! So far everything I have from Logitech is working flawlessly, from my keyboard, mouse, TV universal remote (series Harmony ... REALLY Neat !) and of course my SqueezeBox.
(well .. Mr. Logitech ... I would not be offended if you want to contribute somehow :) )

Time ago I posted some information about the SqueezeBox internet radio and it's Logitech Media Server code.
Just remember that I don't use Windows, so everything in these articles assumes we are talking about Linux. Specifically the Logitech Media Server was installed previously over an Ubuntu 10.04 distro, now is running over a CentOS 5.x one.

This time I want to discuss a little bit more about the server and other projects around it.
First of all, the SqueezeBox is still working quite great !
I updated the server and the firmware a couple of time and few days ago I decided to move the server on another machine.
Why ?  well, just to optimize the resources and free up a little bit the machine previously hosting the server.

Logitech Media Server


So I downloaded the latest version of the code and installed it from the scratch on a different machine (always on my network).
Initially it was not recognized by the SqueezeBox so I checked some things.
Here some hints and things to check :

  • Be sure that the linux machine where the Logitech Media Server  is installed has the port 9000 and 3843 open
  • Be sure that the directory where the music is stored, has the right permissions.
    The permission should be assigned to the user squeezeboxserver (created automatically during the server installation)
  • Check that the server is actually running
    I had some permission set wrong so the server crashed because it could not access the music folder for the scan
  • Give some time !!  There are some timeout involved in the system, so there is some time (15 minutes or more) before the SqueezeBox sees the server
Also remember that any time you change the Logitech Media Server code, a new firmware is loaded in the SqueezeBox !
My current version of the Logitech Media Server is the 7.7.2


SoftSqueeze

While waiting for the SqueezeBox to see the server, I found another very interesting project : SoftSqueeze.
SoftSqueeze is an open source project aimed to reproduce a SqueezeBox on a PC.
Very neat !
It requires to have Java installed.

Use on Ubuntu 10.04

I installed it very simply downloading the RPM from the website and converted it (with alien) in DEB.
Then simply I installed it.
On my machine (Ubuntu 10.04) the DEB installed the main access to the program it in the /opt/softsqueeze directory.
So in order to run it, is possible to open a terminal and then digit : /opt/softsqueeze/softsqueeze

If is working, it's easy to add an icon in a panel. In this case pointing in the /opt/softsqueeze/softsqueeze/lib is possible to find some icons.


After the installation SoftSqueeze recognized the server using the server name I assigned it.
However it was not working.

In order to have it working I had to force the IP address of the server, instead the name of the server found automatically. It is possible that is due to the fact the version of the player (SoftSqueeze) installed is optimized for the server version 7.5.x and I installed the latest one, 7.7.x.


Anyway after forcing the local IP of the server, the player started to work immediately.
So now the new server recognize the SqueezeBox and SoftSqueeze without problems.

Use on Kubuntu 12.04


I have a laptop with installed Kubuntu 12.04 (it uses KDE).
I just copied the DEB package created with alien and installed via the standard package installer.
Same identical procedure and problems find on Ubuntu.
After forcing the IP address of the server instead the found name, started to work perfectly !
Very very neat !

Like the Ubuntu 10.04, I created a link to the application and is working without problems.
So a new way to hear my collection in streaming !

Hope this can help somebody :)

Tuesday, June 5, 2012

Messages between computers (Linux)

In the era of internet, sometime small needs are solved using complicate applications, when "old" but more functional solutions are available.
If, like me, somebody has the need to exchange quick messages between users inside a LAN, here an easy and functional solution.

Problem

To better define the problem, the need is to be able to send to a user on a computer in the LAN, a brief message.
It is assumed the computer running Linux (Ubuntu).
The user doesn't have to start any application nor do something.
Ideally a "popup" window with the message appears on the screen.

Solution

Two programs are needed and "usually" they are installed by default in a standard Ubuntu and Kubuntu distribution.
It is possible to use other programs, but these two are quite easy to use and the "popup" effect is nice.
In order to receive messages, EACH computer we want be able to do so, need to have a "daemon" running.

Here some pro and cons

Pro

  • easy to implement
  • no special programs to install
  • transparent to the user
Cons
  • it is necessary to know the IP address of the computer where to send the message
    If the computer has a fixed IP is not a big deal. In a DHCP environment it could be a problem
  • it address the machine, not the user so it is implicit only ONE user is using the machine
  • ending the process that sends messages, ends also the receiver
  • in order to send more than one message, the receiver needs to acknowledge the messages hitting OK

Prerequisites

I'm assuming :
  • you are capable to open a terminal
  • you are capable to open an editor 
  • you are capable to change file properties
  • you are capable to install programs
  • you don't run in the church if you hear the word "daemon"
  • you have admin permission
If you don't understand one of more of the above prerequisites, then better to ask somebody that understand that to set up the system.

Creating the daemon


The daemon is a program that is running in background. In this case the daemon is a bash script.
Here a step by step guide to create the daemon. Remember, this must be done on each computer we want to be able to receive messages.
Of course is possible to prepare the script somewhere else and copy it on the computer.
Again, it is assumed we are using Ubuntu or Kubuntu with zenity and netcat installed.
  1. open a terminal
    You should end up in your  default home directory
  2. open an editor, for example
    $ vim bkmsg.sh
  3. insert in the file these lines :
    #!/bin/bash
    msgport=3564
    nc -l $msgport | while read message; do zenity --info --text "$message"; done
  4. save the file
  5. make the file executable
    $ chmod +x bkmsg.sh
At this point we have the daemon script ready.
To test it, simply run it in background from the terminal : $ ./bkmsg.sh &
Then open another terminal and digit : nc localhost 3564
When you hit Enter, everything you type until the next Enter, will be sent as message and a popup window will appear.
To stop to send messages, simply hit Ctrl-C.

It is important to understand that even if the script is running in background, closing the terminal where the daemon was started, will end the daemon.

Installing the daemon


We need to have the daemon installed and run automatically.
To do so, we need to put our script in the startup list of application.
Be aware that ending the process that sends messages, ends also the daemon !

Sending messages


In order to send a message to the machine, it is necessary to know :

  1. the IP address of the machine where to send the message
  2. the port used to send message (the one in the script, in the example above it would be 3564
The is enough to open a terminal and digit :

$ nc ip_address_where_to_send_the_msg port

For example if the machine has the IP address 192.168.1.134 and the port the one of the example :

$ nc 192.168.1.134 3564

After that every thing written will be sent to the remote machine after hitting the key Enter.
To close the process, hit Ctrl-D or Ctrl-C.
Be careful that doing so, will close also the daemon on the remote machine !

Wednesday, May 30, 2012

The Rain Barrel project - intro

Arkansas is a nice place to live, but is HOT !
It means that a lot of water is used just to water plants, grass and .. vegetables !
Sure is possible to do a lot in this area, thus the idea to deploy a rain barrel for at least some "important" plants.
The project is modular and mostly will depends about the available resources.

Here some basic ideas and practical notes about the project.

The idea 


The idea is to buy a rain barrel and attach it to the gutter spout for the main water supply.
Then attach a low pressure drip irrigation system controlled by a valve and an electronic circuit.

The problem

In order to attach a low pressure  drip irrigation system, it is necessary to put in the system a specific amount of water pressure.
Gravity controlled rain barrels can work, but it necessary to have at least 10 meters (35 feet) of  difference in height between the sprinkler and the rain barrel.
It is necessary a more sophisticated system in order to bring water to the sprinkler system.
For example a pump is necessary.

The project

This project is about to build a low cost/high efficient  system, using a rain barrel as main tank, filled by rain via a spout.
There are different problems to address :

  • bring the water to the plants using a drop irrigation system
    This is necessary in order  to bring the right amount of water where is needed, without dispersing water on unused soil. To do so :
  • a pump is necessary, since the water coming out from the barrel, has not enough pressure to correctly drive a drop irrigation system
  • this imply to have a way to detect if there is water on the rain barrel and eventually connect to the main water grid to continue the watering
  • in order to use the right amount of water, sensors needs to be deployed in the places where the plants are
  • eventually a solar panel and a battery can be used to power the system, making it autonomous.

First test

In order to experiment and better define the project requirements, it is necessary to start  to have at least a rain barrel and start to monitor some basic data, like how much water can be collected on average, how much water is used by a drop irrigation system, how much water is needed by some plants, and so on.
The first "brick" is of course the rain barrel and the water collection system.

Installing the rain barrel

The first rain barrel used for the plant and for the tests, is a 76 gallons foldable one, found on-sale on the Improvements catalog .

After put it together, it is necessary to found a level spot close to the gutter, where to place it.
In my case, under the deck, just close to a gutter, there is enough flat space where to install it.

Impressions

Easy to put together. The plastic is very thick. 
Seems quite stable on the final place. Easy access to the spigot that is threaded and with also an adapter to connet a "bare" rubber hose.
The spigot and adapter are in plastic, not sure how long they can survive the hot conditions.
No leaking so far.

Execution

The rain barrel needs to stay on a flat surface. It MUST not tilt so a flat surface is mandatory.
Under the deck there is a nice flat area, but is too far from the gutter and thus it will be too far from the rain diverter.
The rain barrel needs to stay no more than 2 feet from the gutter and there the area is not flat.
Even worse there is a piece of  concrete slab close to the house wall, so  it is necessary to build a retainer wall in order to raise the soil over the concrete slab and finally level it !
So the first thing to do, is to create a level terrain big enough to support the rain barrel.


This is the area where to place the rain barrel
Marking the place where to put the rain barrel.

Close to the gutter there is a concrete slab, so it is mandatory to raise the terrain in order to create a solid and flat space for the rain barrel.  


Above, building the retainer wall with some "left over" blocks used for the frontyard  retainer walls.


Here how the rain barrel is placed on it's new base.

Next step, connecting it to the gutter via a rain diverter.


Installation rain diverter

The second task to do, is to buy and install a "rain diverter" for the gutter, in order to bring the water coming from the roof, into the rain barrel.

Choosing the rain diverter 

After some searches, I choose the Fiskars Diverter Pro .

Two main reasons to choose this diverter :

  1. The availability from a place where I had some credit
  2. Good feedback from other users
  3. The dimensions of the gutters
    My gutters are actually 3" x 4" and the standard residential should be 3" x 2"
    This one is natively a 3" x 4" with adapters for the the smaller ones, so I should be covered.   

Installing the rain diverter

The rain diverter must be placed so that the pipe going in the rain barrel, remains horizontal.
This is necessary because when the rain barrel is full, the backflow force the extra rain to go  back into the gutter, preventing flooding from the rain barrel.

Following the instructions come with the rain diverter, I cut out a piece of gutter and then inserted the rain diverter.
The job was relatively easy but not too much easy.
Good idea to wear thick working gloves when handling gutters and trying to push the two end of the rain diverter in it ! :)
Here a sequence of pictures showing the installation of the rain diverter.

Cutting the gutter


The diverter inserted


Some tests


There are some small leaking areas that I will fix with some silicon as soon as the weather allows to do so, but generally speaking it works nice.
Now I can start to monitor if is working properly and how long can take to fill up the rain barrel.


Quick update (June 5, 2012)

We had finally some rain so I was eager to check if everything was working.
I noticed that not too much water was entering in the barrel and I discovered the cause.
The rain diverter need to be screwed to the gutter in 4 places.
2 screws in the upper part and 2 in the bottom. If the screws in the bottom part are too tight, the plastic body of the rain diverter deform itself a little. But is enough to have it bent in the wrong direction !
The solution was to unscrew and screw back with less force, in order to don't deform the diverter.
The transparent plastic cover is a good indicator of deformation. If the body is not deformed, the transparent plastic cover is covering the hole uniformly.
Another important thing to do, is to add some mosquito killer drug in the rain barrel.

Quick update (June 12, 2012)

We had finally some more rain !
This time everything worked like a charm ! The rain barrel is full, no leaking and the overflow worked perfectly ! 

Quick update (June 14, 2012)

First test.
Connected an hose to the rain barrel "as is". With the rain barrel full there was enough pressure (downhill) to have some water coming out. Of course absolutely now way to be able to connect any sprinkler or drop irrigation system.  It was enough to have some plants watered.
Because the impossibility to control the amount of water, this is a really inefficient way to use the water. 

Quick update (June 16, 2012)

First test with the pump.
In order to connect a drop irrigation system to the rain barrel, it is necessary to use a pump since it is necessary to have at least 20 psi of pressure.
A Shurflo pump (2088-488 model) was temporary connected to the rain barrel, with adapters GHT->NPT and NPT->GHT.
The garden hose was connected to the pump.
Limiting the output of the hose was possible to increase the pressure.
The next test is to create a drop irrigation system and see if the pump can correctly drive it.
Problems to solve :
  • the spigot is really poor quality. There are leaking all over the place after the spigot.
  • the water need to be treated with some chemicals.
    The anti mosquito seems working but the very hot weather allows for algae to grow.
    The water starts to smell.
  • with the average rain we are having, 76 gallons are totally insufficient to water the plants more than 3 days ! 

Quick update (June 8, 2014)

The barrel survived so far two winters.
The dirt in the water seems stabilized, i.e. it is a lot but is not a problem to use the water.
It is always necessary to add chemical for the mosquitos.
Honestly the rain pattern on the long run, prevent a real useful use of the rain barrel.
It is always necessary to integrate with the faucet so unless to expand it A LOT, is quite impractical and not beneficial.

Stay tuned !


Thursday, May 3, 2012

YAAA - Yet Another Android Article


Android, the platform to develop mobile applications.
Is time to start to play with that.

It is assumed starting knowing  nothing  about Android.

The first thing is to have some documentation about Android in order to learn about it.
There are a lot of books and documentation out there, so I just started to grab something, possibly free (no resources to invest in that :) ).
As introduction, also if is an old book, this PDF book  can be useful, at least to have some basics idea about Android.
Of course there is the official updated Google documentation where to start, but I have to admit sometime a book is better as starting point. 

Basically to start to develop for Android, at least three things are needed :  

  • The Android SDK  
  • Java SDK
  • Eclipse plus Android plugins
Eclipse is actually suggested, is not mandatory, but since many examples and documentation assume Eclipse to be used, so it is :)
This article assumes the development host to be a Linux one (Ubuntu 10.04 and 12.04)

Installation

First of course download the latest versions of the software to be installed.
The system I used to install Android the first time, documented in this article, is a quad processor Dell computer, with Ubuntu 10.04 installed.
I was able to install the Android development software over a Kubuntu 12.04 following the procedure described on this article.


Java JDK

Java can be the critical part of the system and MUST BE present before to install the rest of the environment.
Probably Java already exists on the development machine, but it is possible is an old one or incompatible one with the Android SDK.
So the first thing to do is to verify if :

  • Java already exists on the machine
  • if the installed version is a JDK version (the JRE version is not enough)
  • if the installed version is compatible with Android SDK 
  • eventually remove it and install the latest one
To verify what version of Java is installed on the machine (Linux only) ope a terminal and digit :

$ java -version
In my case I had :
steve@Oliver3:~$ java -version
java version "1.6.0_20"
OpenJDK Runtime Environment (IcedTea6 1.9.13) (6b20-1.9.13-0ubuntu1~10.04.1)
OpenJDK Server VM (build 19.0-b09, mixed mode)
steve@Oliver3:~$ 
The documentation about Android specify to have Java 1.5 or 1.6 and the  JDK version, so I should be OK.
The latest JDK  is available at this URL.
The first choice, the Java JDK, must be chosen.
In my case I selected this one :
http://www.oracle.com/technetwork/java/javase/downloads/jdk-7u3-download-1501626.html 
After downloaded it I exctracted it in the /home/steve/Android directory but NOT installed for the moment since I assume the one already installed is OK.

CAUTION !  In some distributions Java JDK from Sun/Oracle is not available anymore !
In this case the OpenJDK is the "official" release to use with Android ! 

 Android SDK

The Android SDK contains all the Java libraries to develop for Android plus tools to compile and debug the code, i.e. an Android simulator.  So in theory there is no need to have a specific hardware (see note) in order to install and develop under Android.

The latest  SDK can be download from the official Android  website.
Choose the SDK version for your system. In my case I choose the Linux one.
Create a directory somewhere on your disk where to exctract the tarball. I created :

 /home/steve/Android  and exctracted the tarball into  android-sdk-linux.

Tip
Can be useful to have the SDK tools in the path. Many sources suggest to create a system variable called ANDROID_SDK and add it to the main path.
Edit  the .profile file (in the main user home - for example in my case : /home/steve/.profile) and add :

export ANDROID_SDK="/home/steve/Android/android-sdk-linux"
export PATH="$PATH:$ANDROID_SDK/tools:$ANDROID_SDK/platform-tools"

Save the file. The next time the system starts the Android SDK path will be available, with also the system variable ANDROID_SDK. 
  
Then, after reading the  SDK Readme.txt file, I opened a terminal and run the android program under tool :
$ cd /home/steve/Android/android-sdk-linux/tools/./android   (or if the path is set, ./android)

The program is needed in order to "populate" the SDK. The SDK exctracted is moslty empty.
By default  is marked for installation the latest Andorid SDK, at the time of this article, the 4.0.3.
Follow the instructions and install it (select Accept all)
I choose to install also the documentation. The installation tooks few minutes and of course is necessary to be online since everything needed is downloaded from Google.
Here a screenshot after the installation :


Note : at the installation time I didn't have ANY Android hardware. Having a specific hardware it means to select the version of Android capable to run on a specific one, not necessarily the latest one will work on a specific hardware !!

It is possible to install more than one Android API version and actually is one thing necessary to have.
The project usually uses the correct version as defined in the project parameters.  
To select the correct API to use for a project, go in the Project menu', select Properties and then choose Android.

The API in use for the project is stored in the file project.properties in the project root. 

Eclipse

The last tool to have is Eclipse.
As said before is not mandatory, but since many examples and tools that simplify the life are based on Eclipse, I choose to install it and use it.
As suggested in the eBook, at the URL  is possible to download Eclipse.
There are many different choices. I choose the "basic" Java version called Eclipse Classic. 
After downloading it, I exctracted in the /home/steve/Android/eclipse directory.
To start it, is enough to go in the eclipse directory and start ... eclipse :)
The first thing to do is to create a workplace for Eclipse. I created mine in the /home/steve/Android/Workplace directory.

Configuration


There are some plug-ins for Eclipse that  integrate the Android SDK and facilitate to create Android applications.
The indications on the book are not exactly precise since the version of Eclipse is quite different.
So basically, from within Eclipse, go to the Help menu, select Install New Software.
A windows appears :


In the box Work with, digit the address of the repository for the Eclispe plug in for Android :
https://dl-ssl.google.com/android/eclipse/
In the box below (Name) will appears the possible plug-ins. Mark them all then click on Next and follows the instructions. 
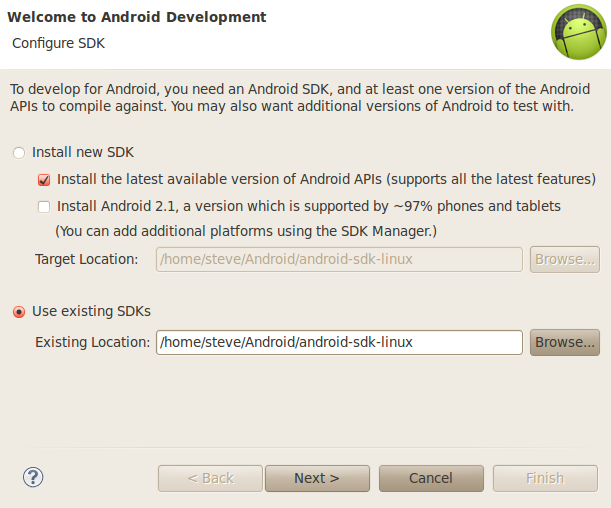
After the installation Eclipse need to be restarted. After that it will asks for the Android SDK.


Since I already installed the SDK, I selected the Use existing SDKs and browse for the main directory of it.
Follows the instructions to complete the binding between Eclipse and Android SDK.
After this point, Eclipse is ready to be used to develop and debug Android applications.

Saturday, February 18, 2012

GXV3140 - Update (02/2012)


The GXV3140 is the latest IP phone from GrandStream.
Here some updated notes since the original post and impressions about this new phone.

Positive things

As I mentioned in the original post, the screen activation based on some motion, is really a nice thing.
When in front of the phone is possible to see information about the status of the line or the time (yeah, I love watches :) ) and if nobody is there ... black screen.

Skype is working well. The quality of audio and video is really good also with Skype.

Also the normal calls with SIP are really high quality.

Negative things


Most of the time the phone is working well, however it is less stable and reliable than the older GXV3000 series.
The GXV3140 crashed at least 4 or 5 times since I activated it.
So far I observed that the crash happens when Skype is activated (i.e. logged in).
Some times it was enough trying to place a call to trigger a crash.  In one occasion I had the phone crash without doing any operation, probably after 2 days of continuous log-in to Skype.
Usually the crash manifest itself with a "frozen" system, i.e. the display shows something but the phone is totally non-responsive.
The only thing to do is to unplug the power, wait few seconds and then reconnect the power.

It would be interesting monitor the IP traffic to the phone to see if the crash is due from attempts to attack the phone.
Skype is notoriously dangerous, I don't think the phone is "smart" enough to protect itself.

Another annoying characteristic is the menu' to place a call.
To place a call, assuming to have the number in the phonebook, is necessary to press a lot of buttons, much more than the GXV3000.
First the phonebook button, then select the user, then press the F1 (assigned to the call function), then select if the call is only audio or audio/video and then finally the call is placed.
Really time wasting.

Still remains the impossibility to change some  parameters in the phone. Probably a factory reset is necessary but so far I didn't spend time on that.
Maybe one of these days.

The automatic gain of the camera is quite annoying.
It's enough to move little bit far from the phone during a call to have the image transmitted to become totally dark. I did try also other settings but the final effect is not better.

Skype doesn't support conferences. That would be quite useful.