Translate

Saturday, October 1, 2011

Roomba repair - common problems


It's quite a while I play with Roomba.
Here a list of the common problems for these little robots (3rd and 4th generation) placed in the most probable happening order.

Battery

THE Roomba common problem is of course the battery.
On average, at least once per year, the battery dies.
It depends about the use of course, and contrary to the common sense, more a Roomba is used, more the battery last.
But as said, on average the battery last about a year.

NiCd batteries are lasting even less, mostly due to the "memory effect".
NiHi batteries are better.

Deck/motor

The second typical  problem that can happens to your Roomba, is in the deck motor or in the deck gearbox.
The deck motor is the electric motor that drives the brushes.
Typically the problems in these areas are happening when the Roomba entangle in wires or thick carpets.
When trying to remove itself,  more trust is placed on the brushes and if this happens often, after a while the mechanic can be damaged.
Actually there are different kind of problems that can happens to that area  :

  1. broken motor gears
    The motor has a gearbox used to increase the torque.
    There are 3 gears inside the motor and they are made in teflon or plastic.
    The typical problem is that one or two of these gears, broken up, losing one or more "teeth".
    The final result is to have the motor spinning and  the main shaft not moving.
    It's enough to replace the gears to fix the problem.  Unfortunately  a new set of gears can cost more than the motor ... so often is more cheap to buy a new motor with a new gearbox (they come as single piece).
  2. broken motor
    More rare but it happens that some internal connections broke.
    In this case the only thing is to replace the motor.
  3. broken electronic
    The motor is driven by some electronic. Specifically a Mosfet is feeding the motor.
    Sometime, even more rare than the broken motor, is the electronics that fails.
    In this case "in theory" is enough to change the mosfet to fix the unit.
    Unfortunately it is extremely difficult because you need to take TOTALLY apart the Roomba in order to extract the electronic.
    Then you change the component and in order to test if the repair is correct, you need to put back totally the unit !
    It's about 2 hours work and if something goes wrong, you need to do it again !
    Unless to have a Roomba simulator , in order to test the electronic without the need to put it in a Roomba, is one of the worse case scenario for repairing a Roomba.
Also the deck gearbox can have problems :
  1. broken gears
    Like the gears in the motor, the gears in the deck gearbox can loose teeth or broke down.
    Having other broken decks is possible to substitute the broken ones.
  2. broken gearbox cage
    A couple of times I had to repair a gearbox deck cage broken.
    The gearbox cage is screwed to the deck and if broken can not keep the gears in the right place.
    Change the gearbox deck cage or the entire deck.

Wheels

The third typical problem with Roomba are the wheels.
The Roomba wheel is quite complex object. It is composed by four parts :
  1. electric motor
  2. planetary gearbox
  3. sensor
  4. tire
Each one of these elements can develop problems, but the most recurring problem is on the sensor.
The sensor is used to determine the speed  of the wheel and is very simple.
A special wheel with some openings is mounted on the main shaft and the light from an infrared LED can reach a photodiode only when an opening in the wheel happens.
The problem is that dust can, and does on time, cover the photodiode, so that become insensitive to the infrared light.
The result is that Roomba loses feedback from the wheel, starting to act crazy.
The phenomenon is well known as circle dance and usually cleaning the sensor solve the problem.
With some luck can be cleaned with compressed air, otherwise the wheel needs to be taken apart.

In all these years I own many Roomba, I never saw a planetary gearbox broken.
It is rare, but is possible to have tires used so much that the rubber is incredibly thin or the electric motor defective.

Thursday, September 29, 2011

Force bash under Ubuntu

Many Ubuntu distributions use dash as default for the shell.
I prefer the classic and more powerful bash.

Here a quick way to force the bash shell as default.
Open a terminal and execute this command :

$ sudo dpkg-reconfigure -plow dash

A message will appear indicating the default shell in use (it should say "dash", in this example is bash because I already executed the dpkg-reconfigure)


Choose No.
Done. From now on the bash shell is the default one for the user.

Wednesday, September 21, 2011

Logitech Squeezebox review


Here some notes about the Logitech Squeezebox IP radio.   squeezebox.jpg
Until few months ago, my only experience with the IP Radio was with an Aluratek, until it broke down.
Since I did not have ANY KIND of support from Aluratek, even if the radio was under warranty, I decided of course to don't go again with that brand.
If maybe somebody has not understood ...  Aluratek is a no no brand for IP radio !  

Then a friend of mine  made me a nice gift with the  Logitech Squeezebox IP Radio.
Here some notes and impressions.

Pro and cons

Here a quick lists of pro and cons based on my experience so far.
Pro :
  • Well, the brand.  It is a nice product and the company support rocks !
  • Easy to operate, easy to configure
  • No needs to read manuals/documentations
  • Wired and wireless connection available
  • Very nice sound
  • Hackable !!!
  • It uses Linux !
  • Streaming server open source and available for Windows/Linux/Mac
  • With a battery it can be disconnected from the main power and become portable (battery and IR remote as expansions)
Cons :
  • The cost
  • No IR remote by default

General

The radio is really nice and "heavy" enough, easy to manipulate.
The user interface is based on a rotary encoder  pushable and few main buttons.  Easy to operate, though boring if you have to write something (like searching for a song or radio digiting the name).
Few problems with the wireless setting and DHCP but I think are my network problems, not a radio fault.
Setting a fixed IP and wired connected solved for now all the problems.  I'll experiment eventually in future with the WiFi. In order to have the radio working properly I had to disable the WiFi router DHCP server, keeping only the main one (on the main router).
Once set up the WiFi the radio was able to catch an address from the DHCP server.
By default the radio try to connects with a Logitech server, mysqeezebox.com.
Going there with a browser allows you to set up many features of the radio and found a lot of radio stations.
Then it is possible to install a server (available for Windows, Linux and Mac) in order to stream your own music from your network.
From there all the radio are accessible as well, so basically there is no need (like Aluratek) to access a specific company-related server.
And amazingly ... the radio is Linux based and the server is open source !!!
And now some more details about some characteristics/experiences.

Setting up

As I said, the radio is easy to configure and set up.
I had few problems with the WiFi setting, very probably due for my network.
I didn't want to spend too much time on that, so for the moment I solved assigning a fixed IP to the radio and connecting it in wired mode.

Both DHCP and direct IP are supported, for wired and wireless connections.
No problems.

Server

I installed the Logitech Sqeezebox server for Debian (Ubuntu) and it worked as soon as the installation was ended.
However I had to solve a small problem (again due to my system and not to the server).

Music Library

During the server setting,  it is necessary to assign a path for the Music Library to use for the stream.
In my case the music collection is hosted on a 1 TB Hard drive.
For some reasons, the hard drive is not automatically mounted at the boot time, so the first time I turned off the PC and then back on, the server was not able tofind the scanned music.
Mounting the hard driver and restarting the server solved the problem.
probably solved the problem installing an utility called pysdm (sudo apt-get install pysdm).
This utility assigns a fixed name for a driver and mount it at every boot.
Now the drive is mounted at the boot time so the server (that starts automatically) always find the music files.

Alarms

Basically the radio shows a list of the possible "networks", among them the server.
When selected, the radio try to connect to it in order to retrieve Favorites and settings.  Alarms included.
This actually created an unexpected behavior.
If the computer running the server is turned off, turning on the radio causes the PC to start !
Because of that, the PC starts automatically when an alarm is firing !
For me is an extra feature, I have the PC turned on automatically in the morning !

Pictures

If in a directory containing a MP3/FLAC CD, exists the cover image of the original CD, the picture will be showed both on the radio and on the server.
I'm not sure about what name it should have.
I experimented with "Folder.jpg" and AlbumArt_Large.jpg, AlbumArt_Small.jpg and AlbumArtSmall.jpg.
In case images are added, it is necessary to force the rescan of the Music directory on the server.

Use

Here some tips and trick about the radio.

Server

In order to use or configure the server, simply open the browser and digit :
http://localhost:9000
Of course if the server is running on a different machine, simply use the machine IP.
From the server is possible to control the radio. In my case is working also :

http://oliver3:9000
http://192.168.2.106:9000
squeezeboxserver.png

Server selection

In order to use the server, the radio needs to select it.
Using the radio menu and controls, select the server (it will appears with the name used during the server installation)

Wednesday, September 7, 2011

Ubuntu boot problems

One of the Ubuntu machines I have, today woke up in the bad mood.
The boot failed ending in a BusyBox splashscreen :

Busybox v1.1.3 (debian 1:1.1.3-5ubuntu12) Built in shell (ash) Enter 'help' for a list of built-commands

The problem is relatively simple, the hard drive screw up a little bit.
Many suggestions found on the net suggested to boot in Windows, do a check of the disk and re-boot.
That's nice if you have Windows installed somewhere.

For who, like me, doesn't have Windows nor even think about to install it, here a simple workaround.


  1. Look for a live Linux distro and boot the PC with it
    I used Knoppix.
  2. Look for GParted (Disk partition utility)
  3. In GParted look the drive (hard drive), select it, choose "check"
  4. When the check is finished, reboot normally
It should work.
It worked for me anyway :-)

Tuesday, August 30, 2011

Roomba repair - cleaning techniques


For 3rd and 4th Generation Roomba  

CAUTION !  What described here can damage your Roomba if you don't know what you are doing, and it also make void the warranty !
I'm not liable in case of problems following these suggestions. YOU are responsible about what you are doing.

The most recurring problem for Roomba, is related to the cleaning job is supposed to do.
Dust, hair, strings, ecc., after some time, especially if the unit is not maintained properly, can create problems.
So the first thing to do when repairing a Roomba, is to have it cleaned up.
There are different cleaning techniques, some of them can be applied sequentially to the unit, depending how much dirt is the robot.
I'm describing here the techniques I'm currently using to clean up a third or fourth generation Roomba.

Blowing the unit
The first thing is to blow the unit with compressed air or, like me that I don't have compressed air, with an electric blower.
Better to do that in an open space, not in the house, since usually is coming out a LOT of dust.
I usually open the garage door, then I prepare the Roomba removing the battery, the dust bin and the brushes.
Then I place the Roomba to be cleaned on the floor, "as is" (i.e. I don't take it apart yet) and start to blow everywhere, up and down, trying to direct the airflow in every accessible place.
Also, place the Roomba upside down to clean up the wheels and the bottom of the deck.
Usually clouds of dust and hairball can escape the unit, so better to wear a mask.

Apply the same treatment to the dust bin, removing the filter and direct the air flow also in the vacuum propeller.

Vacuuming the unit
After the initial blowing, the second stage of the cleaning, require to take apart the unit.
Remove the bumper, the top case and the rotating lateral brush.
Doing so many internal parts become exposed, and it is possible to vacuum the unit, in order to remove pieces of dust still attached to the internal parts.
It is typical to have airballs mixed with dust on the deck and dust stuck in little spaces, not accessible from the outside.

With "not so dirty" Roomba, the blowing and the vacuum are enough to have the unit clean.
In these cases is enough a wet cloth or some cleaning cloth products, to remove the dust and have back the unit like new.

Same treatment to the dust bin. Just be sure to remove the filter first.

Unfortunately many Roomba never received a decent maintenance during their life.
For these units is mandatory to proceed to the third cleaning phase.

Washing the unit
For very dirty units, it is necessary to wash them.
Depending what you have available, there are different techniques.
Having an old dishwasher available, it is possible to put Roomba in it and perform a short cycle.
I have an utility sink in garage, so what I usually do is to fill up a basin, big enough to contain the Roomba, with warm soapy water.
I use a car wash soap, in order to remove also some external greasy dirt, and a mild brush, to gently stroke in every accessible unit part.

For very dirty Roomba is maybe better to detach the deck from the unit and having it washed separately.
Put the Roomba in the warm water, agitate the water (so to allow a deep penetration) and use the brush (gently !!!) on electronics and mechanical parts.
Then rinse accurately the unit with fresh water.

The trick is then to dry the unit as fast as possible.
After moving the Roomba up and down for a while, in order to remove as much water as possibile, I normally use the blower as first drying step, so to force the water out from inside.
Then I place the unit under the sun (here in Arkansas is quite powerful) for few hours.
An alternative could be to use a dryer, of course assuming the dryer has a stable internal platform (many dryers have that option).
Is not a good idea to place the Roomba in the drum !!!

The same technique can be applied to the dust bin, unless is a dust bin with the Empty indicator.
This kind of dust bin is called Intellibin.
These dust bins have an extra electronic powered by an independent battery.
So DON'T WASH the dust bin unless you remove first the battery.
Unfortunately to remove the battery, you have to totally take apart the dust bin !


Video


Here a video that shows how to perform a "vacuum type" of cleaning, i.e. opening the Roomba and cleaning the inside.
The video has the soundtrack in Italian but I think it can be helpful anyway.
The time necessary to do a decent job, assuming to have a little bit of experience in opening and closing the Roomba, is around 30 minutes more or less.


Sunday, August 28, 2011

Interface Roomba-USB

In order to diagnose/repair a Roomba, it is necessary to do some test and measurements.
Even if each Roomba has a diagnostic program on-board, often is necessary to have more control and a better feedback, with also some measurements.
To do so the basic tool every Roomba-hacker needs to have is a cable to connect the Roomba with a PC.

There are many ways to buy/build such cable.
This article describe how I did it, just to give ideas. Is not necessarily the best way but it worked for me.

Material


We started from a consumer SIM USB card reader.  These readers are available on ebay and similar places for few dollars.
Here a picture of the electronic board (they usually come in some kind of plastic box).


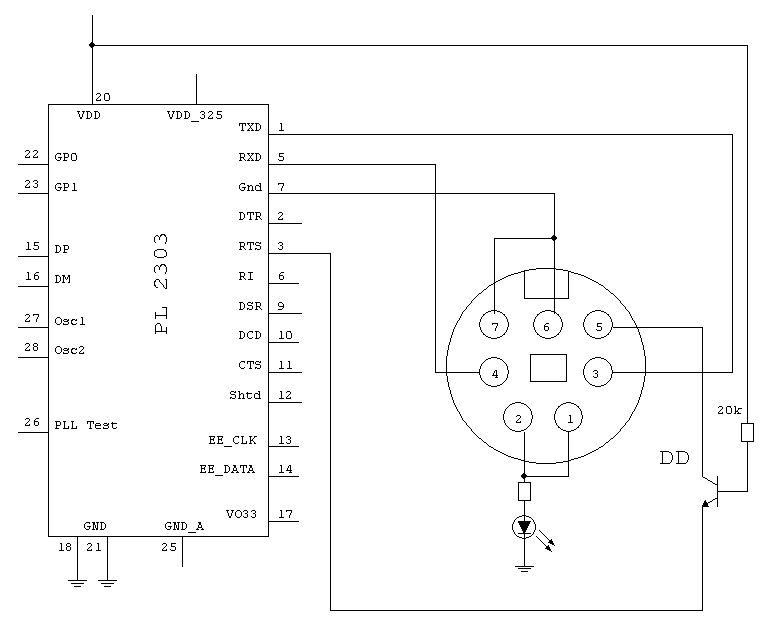
These USB SIM card readers usually are based on a chip capable to convert the USB port into a serial one, the Prolific PL-2303.
Then a cable with a minidin connector is needed and eventually a PCB minidin.
In my specific case I used :
  • USB SIM card reader
  • 8 pin minidin PCB outlet
  • 8 pin minidin cable (at both ends)

Preparation


The first thing to do is to remove from the USB SIM card some useless components, like the SIM card connector, a 74HC04 and a Crystal (3.5 Mhz).


At this point is necessary to identify on the PL-2303 the pins we need to connect.
  • Pin 1 PL-2303
    TXD -> connected to the Roomba RXD (pin 3 minidin)
  • Pin 3 PL-2303
    RTS -> connected via a transistor to the Roomba Power pin (pin 6 minidin 7 - pin 5 minidin 8)
  • Pin 5 PL-2303
    RXD -> connected to the Roomba TXD (pin 5 minidin 8 - pin 4 minidin 8)
  • Pin 7 PL-2303
    GND - pin 6/7 minidin 7 - pin 7/8 minidin 8)

Here the schematic of what we want to do :


It is very important to pay attention of the type of minidin used.In the schematic I used the original Roomba minidin 7, so the pinout is DIFFERENT from the minidin 8 !
On the net is possible to find information about the pinout and specifications, like here.
Here some pictures of cable preparation.


Tuesday, August 23, 2011

Fixing an Infoglobe

One of the Infoglobe I have, started to have problems time ago.
Initially the problem was random, one row of the message, was missing for few seconds, then working normally.
But on time, the missing row problem become permanent.
Then another row started to dim and then disappeared.

Monday, August 22, 2011

CY7C68013A USB Logic Analyzer - Update

Time ago I received to test a little board based on the Cypress CY7C68013A and I wrote some notes about it.
This is a quick update of those notes.
These are informational notes only and are old!
I strongly suggest to buy the Logic package in order to have  the best results and easy operations.


usblogic_1.jpg

The CY7C68013A USB Logic Analyzer is a small board made by a Chinese company (Lcsoftsold on Ebay from a China re-seller as a Logic Analyzer tool.
It's a small board based on a Cypress CY7C68013A micro-controller (an 8051 clone).

Exists a relatively easy hack in order to have the board working with Logic under Linux (tested with the 1.1.9 version under Ubuntu 11.04 quite time ago).

Here the hack :
  1. Be sure to don't have Logic running on the Linux  box
  2. Power on (plug-in) the Cypress CY7C68013A board
  3. Wait few seconds, the time for the board to start
  4. Remove the jumper J1
  5. Start Logic
After few seconds Logic will indicate ready to Start.
What happens is that without the jumper, Logic (at least the version 1.1.9) is loading the necessary firmware in the board and then start it.
Note that if you put back the jumper, all is working until you turn the board off and then back on or close Logic.
i.e. the firmware loaded is not permanent, every time it needs to be loaded.

I decided to put the board in a small box, for better protection and to be able to host a push-button.
Not having around any decent box, I temporary used two pieces of plexyglass. Ugly but functional :-)
I used a NC push-button, connected of course to the jumper J1.


Now in order to use the board with Logic, simply connect it to an USB port, then after few seconds, push the button and, while keeping it pushed, launch Logic.
When logic come out with Start, release the button and everything should work.

When closing Logic the configuration is lost, so it is necessary to un-plug the board  then plug the board back, following the procedure described above.
Much better to have an original Logic board.


Wednesday, August 17, 2011

Use Wireshark to monitor a VoIP phone


In a typical LAN environment, today are in use routers and switches.
This improves a lot the performances of a network but make more complicate to monitor a specific appliance, like a VoIP phone. 
In order to capture the traffic on a specific node, assuming is not possible to run a monitor tool on the node itself, it is necessary to use a tool capable to be put between the nodes, or use a switch/router with monitor capabilities.
The main monitor tool in this discussion is the program Wireshark.
There is an article about this issue  on the Wiki for Wireshark .
Since I don't have a switch with monitor capabilities,  the fastest way to set up a generic monitor machine is to use a laptop, with two NIC cards, acting as bridge and running Wireshark on one of the two NIC or on the bridge itself.


Shopping list
It is needed :

  • 1 laptop with Linux installed, with two ethernet ports
  • 1 PCMCA  NIC if the laptop  has already an embedded NIC
  • bridge utilities
  • Wireshark

The environment

The machine used to build the monitor is a Gateway Tablet running Ubuntu 11.04, plus a LinkSys PCMCA NIC  card.
The first step, recognizing the extra NIC card, should not pose any problem.
In my case the LinkSys NIC was recognized and configured automatically by the OS as eth1.
The next step is to install  Wireshark from the Ubuntu repository, and enabled it to capture packets from eth0 or eth1.
Here the configuration  adopted for the machine :
  wshark_1.png
Bridge setting
After preparing the hardware and tested both the ethx ports, it is necessary to set up the machine to act as a bridge, in order to have packets received from the eth0 port sent to the eth1 port, and viceversa.
Without such functionality, the two networks are isolated, i.e. the phone can not receive anything from the network.
In order to simplify the configuration, I forced on both the NIC a manual address.

  • 192.168.2.70
    for the eth0
  • 192.168.2.71
    for the eth1.

After opening a terminal,  install the  brctl  program (sudo apt-get install bridge-utils).
The bridge-utils are not installed by default in the Ubuntu 11.04 but are available in the repository.
At this point I created, configured and activated  a bridge between the two NICs.
  • sudo brctl addbr wshark
    Create a new bridge called wshark
  • sudo brctl addif wshark eth0 Add the eth0 to the wshark bridge
  • sudo brctl addif wshark eth1
    Add the eth1 to the wshark bridge
  • sudo brctl stp wshark on Enable the STP
After creating the bridge, it has to be activated.
To do so, simply use the ifconfig command :
sudo ifconfig wshark up
At this point the bridge should be  working. 

Running Wireshark

After the bridge is activated is possible to run Wireshark.
Among  the available interfaces to use to capture traffic, it will be present a wshark interface that is the bridge.
To capture data is possible to use it.
That's it.

Sunday, May 8, 2011

Kindle DX - mini review


Like many technicians, often I have to deal with a lot of documentation.
Specifications, internal documentation, development notes, products documentation, programs documentations, technical books ... is quite an impressive amount of stuff to read.

For years the only way to deal with this stuff was just to print out the most used ones and keep read on the PC  the rest.
Unfortunately read documentation on the PC has many drawbacks.
The normal LCD screen tends to cause fatigue to the eyes and the brightness tire very fast the eyes.
Also the position is not helping.
I'm already forced by the nature of my job to stay seat for long time in front of the computer.
The ideal is to be able to go elsewhere to read, possibly outside :-)

And this is the other limits of the normal screens.
The 99% of laptop LCDs are basically unreadable outside.
So you can only print out what you want to read .. but this cause another problem, actually more than one.
Printing out even a couple of documents with more than 200 pages (quite usual in my field of work) means to have a quite heavy and bulky object to handle.

Until few years ago there was not much alternative, but now the ePaper (or eInk) allows to have eBook readers.
It sound the best answer to the problem to read documentation without the need to print it out or read it on a LCD.

Problem solved ?
Well, not quite.
The 90% of the technical documents and available technical books/papers/ecc., is in PDF (Portable Document Format).
The majority of the eBook reader on the market, has a quite small display, usually about 7".
This limit a lot the usability of the eBook to read PDF files.

Alternatively there are many "tablets" out there, but they have two big problems, actually three :
  1. the cost
  2. the LCD problem
  3. the battery time
A typical entry level tablet costs around 400$, more if is something really usable like the iPad.
But still remains the problem to read in fully sunny light and the battery last just few hours.
So an eBook seemed to me the better choice anyway to read technical documentation.

Kindle, one of the most diffuse eBook readers, especially if related to the price, introduced with the serie 3 (the current one at April 2011) a better PDF support.
But still the dimensions are not helping.
Then I discovered the existence of the Kindle DX.
Kindle DX has a 9.7" inches screen and it seemed to me the best choice to read PDF files even if quite priced ($380).

First impressions

So far I was right, here some notes about this new  toy, a Kindle DX Graphite.
Really a neat object and a very impressive contrast and easy readability.

As first thing I immediately connected to the USB port of my PC (Ubuntu 10.04) and voila', a neat Kindle directory opened immediately.
Kindle DX is seen as a normal USB hard disk, so I just loaded in the Document directory some documents, keeping them in separate directories.


I loaded many different types of PDF documents , from specifications, magazines, technical books and white papers and also documentation I made.
Without the need to zoom the documents are perfectly readable.
The dimensions are little bit less than a normal letter format sheet but still fully readable.


This picture is from my Kindle DX showing an old electronic magazine page, with a schematic.
Really impressive the details.


In these two pictures there two pages from an ETSI specification (for the curious, is the ETS 300 102, the basic layer 3 signaling for ISDN).

And of course I can now buy eBook from Amazon :-) and download tons of free books from many places.

The only thing that is missing from this nice toy, is a WiFi connection.
It has a 3G connection that allows even some light  use of a browser, but is really not very useful, too slow.

But the main purpose, to read tons of technical documentation in PDF, is totally nailed down !
I can load it and go everywhere, anytime, to read it.
Cool !
----------------------------------------------------------
Update

Few days ago I had a nice chance to put the toy at serious work.
I was stuck for few hours waiting for the service of my car, and of course I had with me the Kindle.
I was able to study some protocol specifications, even retrieving some missing ones via the 3G connection.
Very very nice ! Two very productive hours otherwise lost.